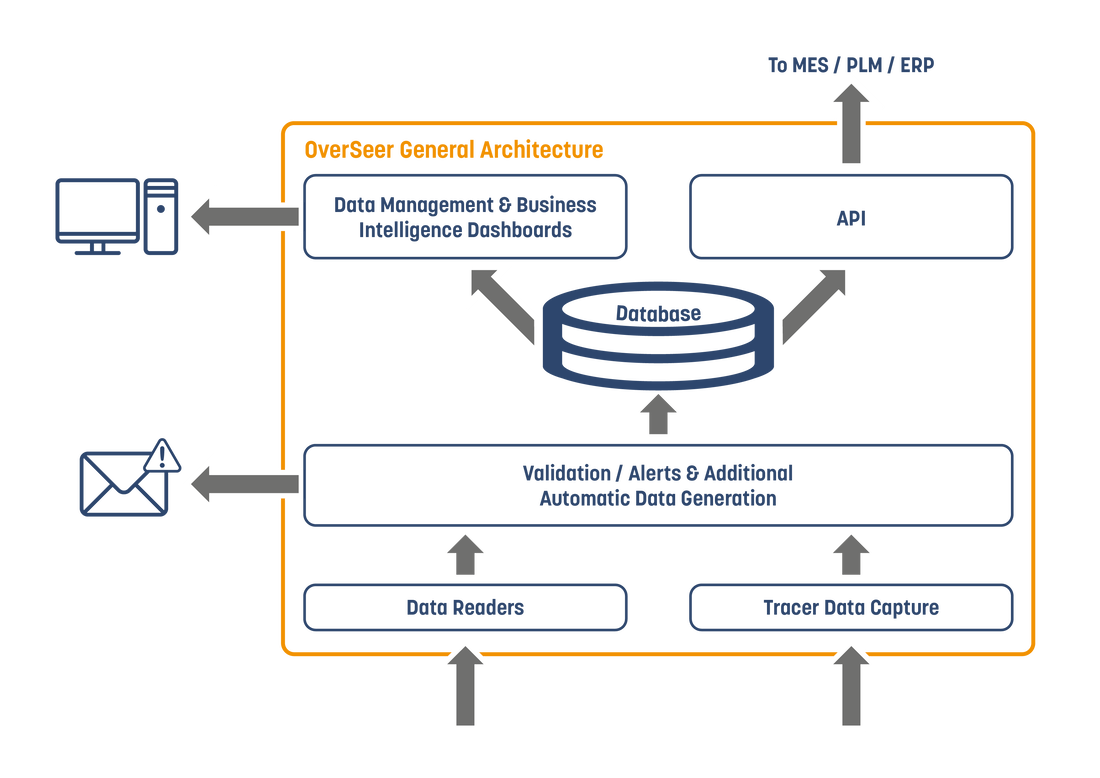
To date we haven’t promoted our ADR system publicly, deciding to concentrate on working with select companies and individuals to fully develop it. However it has formed a natural addition to OverSeer’s framework. OverSeer collects inspection data and performs validation and calculations upon it, notifying stakeholders of results and storing data for further analysis. ADR is just another calculation.
This flagship installation at an aerospace metal production facility was installed in August 2018 and utilises many of JetSoft’s software features. We are gathering positive feedback from the site about the quality and productivity benefits it is delivering, including:
- Automatic defect and characteristic recognition
- Combining factory wide data with inspection information
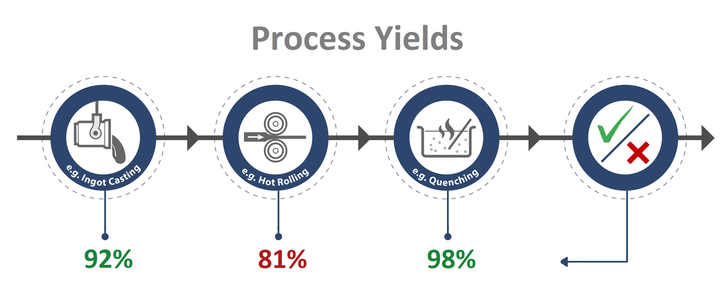
- Driving process change
- Generating new insight and enabling predictive maintenance
- Reducing the requirements on downstream processes
In a series of upcoming posts, I will discuss these areas in more detail to explain how our processes deliver these benefits, starting with an insight into our ADR software.
A note on ADR
Firstly, this article uses the term ADR, which is an industrial term to mean the automatic detection of a problem within a component. ADR isn’t clearly defined yet within the industry, as explained in the previous post ADR - what’s expected?
The installation discussed in this article is an Automatic Indication Detection (AID) system, where inspections are still signed off by a qualified human operator.
How it works
JetSoft’s core mission is to provide systems that automatically aggregate and catalogue inspection data into a single database. We understand inspection data, and we gather it into a convenient format to take advantage of it. Our solutions combine quality control information with data from other manufacturing systems. These include details about the processing conditions that the part has gone through, details of the component structure and the customer specifications. Combining this information, and making it available for all, has the huge benefit of keeping quality at the forefront of everyone’s mind. I will talk about this in more detail in a future article.
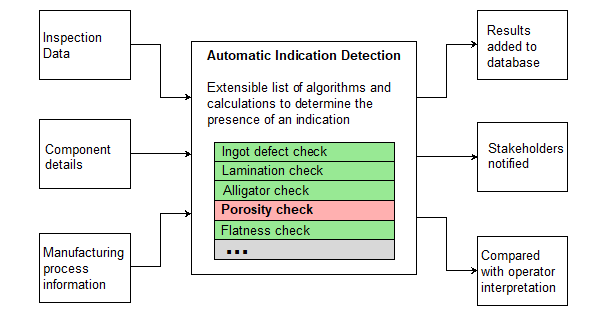
This collated data is passed through an extensible list of models which are trained to look for particular faults or certain characteristics. Each model outputs a confidence level based on the likelihood that the inspection contains a positive match. Any disagreement between the system and inspector is highlighted to the responsible level 3 or automatically sent for a second opinion. This drastically minimises the potential for misdiagnosis. Additionally, the output of these models is stored in the system and is made available for analysis.
Thresholding of output confidence enables the user to select the desired level of Probability of Detection (POD).
Model training is in depth and employs a hybrid approach using a combination of pre-processing, AI machine learning techniques using historic data and deterministic algorithms.
One of the key advantages of this system is its ability to subcategorise defects. For example, this system can differentiate between a lamination crack caused by rolling and a quench crack caused by heat treatment. Detecting this distinction is non-trivial for a human inspector, requiring further analysis
Similar defects which are caused by different process may look very similar to inspectors, but it is important to differentiate them to target improvements towards the appropriate processes. For inspectors to make this distinction may require additional training and further analysis, whereas the systematic solution is automatic, quick and consistent.
I mentioned earlier that the system can be configured to identify any characteristics, not just defects. This is important as there are many things we may want to observe and track that could indicate future problems which in time could lead to defects, or just a general reduction in quality. The time and cost investment of training inspectors to manually identify such trends or patterns would not be justified, however by recognising these warning signs early, there is time for mitigating action to be taken to reduce scrap rates in the long run.
Key benefits summary
An independent assessment – this system provides an independent assessment alongside the inspector. If there is any difference between the system and the inspector, the responsible level 3 can be alerted or it can be automatically sent for a second opinion. This improves quality and reduces the chance of mistakes or misdiagnosis, without increasing operating costs.
Sub categorisation of defects – this is the big commercial driver behind the software. It is the application of this feature that has seen scrap rates plummet. An inspector’s job is not necessarily to interpret the cause of a defect, but to highlight its existence. By training models to examine for defects with a known cause, we can target our time and efforts on improving process where we will see the most commercial benefit. This creates a feedback loop of high-quality, useful, data from inspection to all other departments.
Next time
Quality should be everyone’s responsibility, but this is only achievable if everyone has a clear vision of quality, and their impact upon it. JetSoft is providing the tools that deliver real time statistics which demonstrate and communicate quality to all.
Next time we’ll look in more detail at how we’re achieving this and how JetSoft’s is helping everyone to take ownership of quality.


